If you’re looking to locate the test point for a Huawei POT-LX1 (P Smart 2019) and perform an FRP (Factory Reset Protection) reset, I can guide you through the general process based on common methods used for this device. This is typically a technical procedure that involves hardware and software steps, so proceed carefully to avoid damaging your device.
Step-by-Step Guide For Huawei P Smart 2019 FRP Reset
1. Understand the Test Point Purpose
The test point on the Huawei POT-LX1 is used to boot the device into a special mode (often called Huawei USB COM 1.0 or Emergency Download Mode) that allows tools like SigmaKey, Octopus, or EFT Pro to bypass FRP or flash firmware. FRP is a security feature tied to the Google account previously synced with the device, and resetting it requires bypassing this lock.
2. Gather Required Tools
Hardware: A USB cable, a small screwdriver set, tweezers or a metal pin (for shorting the test point), and a steady hand.
Software: A PC with a tool like SigmaKey, Octopus Huawei Tool, EFT Pro, or similar FRP bypass software installed. Ensure you have the Huawei USB drivers installed on your PC as well.Device Prep: Ensure the POT-LX1 is powered off and the battery is disconnected (if possible).
Locate the Test Point
Open the Device: Carefully remove the back cover of the Huawei POT-LX1. This usually involves unscrewing small screws and gently prying off the cover with a plastic tool to avoid damaging the clips or casing.
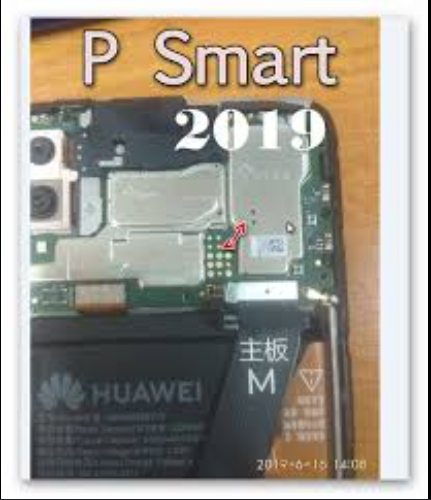
Find the Test Point: The test point for the POT-LX1 is typically located on the motherboard. It’s a small metal contact that, when shorted to ground (e.g., the metal frame or a ground pin), forces the device into the required mode. For the POT-LX1, this is often near the USB port or the SIM tray area, but the exact location can vary slightly. You may need to search online for a specific POT-LX1 test point image for your device’s board version (e.g., POT-LX1AF, POT-LX1RUA, etc.), as Huawei sometimes adjusts layouts.
Tip: Look for two small pads or pins labeled subtly or identified in repair forums. If unsure, a quick web search for “Huawei POT-LX1 test point” with your specific model variant can help pinpoint it visually.
4. Prepare the Device
Disconnect the battery (if removable) by gently unplugging its connector from the motherboard. This ensures safety and prevents short-circuit risks.Have your USB cable ready to connect to the PC once the test point is shorted.
5. Short the Test Point
Using tweezers or a metal pin, short the test point to ground. Ground is usually the metal shielding or a screw hole on the motherboard.
While holding the short, plug the USB cable into your PC (do not connect it to the phone yet).
Now connect the USB cable to the phone while maintaining the short. You may need to hold it for a few seconds until the PC recognizes the device.
6. Verify Connection
On your PC, open Device Manager (Windows) or check your FRP tool’s interface. The phone should appear as “Huawei USB COM 1.0” or a similar port. If it doesn’t, double-check the test point and ensure the drivers are installed.
7. Perform the FRP Reset
Using a Tool: Open your chosen software (e.g., SigmaKey, Octopus, or EFT Pro).
Select the Huawei model (POT-LX1) and the COM port detected.
Choose the “Remove FRP” or “FRP Reset” option.
Click “Start” or “Unlock,” and the tool will communicate with the device to bypass the Google account lock. This usually takes a few seconds to a minute.
Progress: The tool will display logs confirming the FRP reset is complete.
8. Finalize the Process
Once the software confirms success, disconnect the USB cable and remove the short from the test point.
Reconnect the battery (if disconnected) and reassemble the phone.
Power on the device. It should boot up without asking for the previous Google account.
Important Notes
Caution: Opening the device and shorting the test point carries risks. If done incorrectly, it could brick the phone or damage components. Proceed only if you’re confident or have experience with hardware repairs.
Software Variations: Different tools might have slightly different interfaces, but the core process (test point shorting + FRP reset) remains the same. Check your tool’s documentation for specifics.
Firmware Option: Some methods involve downgrading firmware (e.g., from Android 10 to 9) before resetting FRP. This isn’t always necessary with the test point method but can be an alternative if tools fail.
Troubleshooting
Device Not Detected: Ensure the test point is correct, the short is stable, and drivers are installed.
FRP Not Removed: Verify the tool supports the POT-LX1’s security patch level (check the Android version and build date in recovery mode if possible).
Phone Won’t Boot: If it’s bricked, you may need to flash firmware using the same test point method with a stock ROM.
If you need a visual reference for the test point or exact tool settings, let me know, and I can refine the guidance further! Have you already opened the device or chosen a specific tool? That could help tailor the advice.